Making my Gen 2 Starlink run from 12v
Introduction
This is the tale of me changing my Generation 2 Starlink (rectangular dish) system to run off 12v. And before you ask, there is no YouTube video to go with these details. The diagrams and photos (which I will add later) should be sufficient to either scare you, or give you enough confidence to have a go.
Why would I do this?
- I work online.
- I travel around Australia in a caravan and don’t want to use my inverter for this as it will be on just about full time that I am stationary, and you always lose some power in the conversion.
- It means I can stream to the 12v TV at any time rather than needing the main inverter on to allow that.
- The router/access point that came with Starlink is VERY basic and I need few more features (VPN, port forwarding, ethernet ports, etc)
This is NOT for the faint hearted. You are making significant and permanent changes to the system! That said if you really botch it up or want to go back to the original system all you need to do is buy another cable from Starlink and you are back to square (Au$140). Proceed at your own risk!
My First Idea
A bit of background…
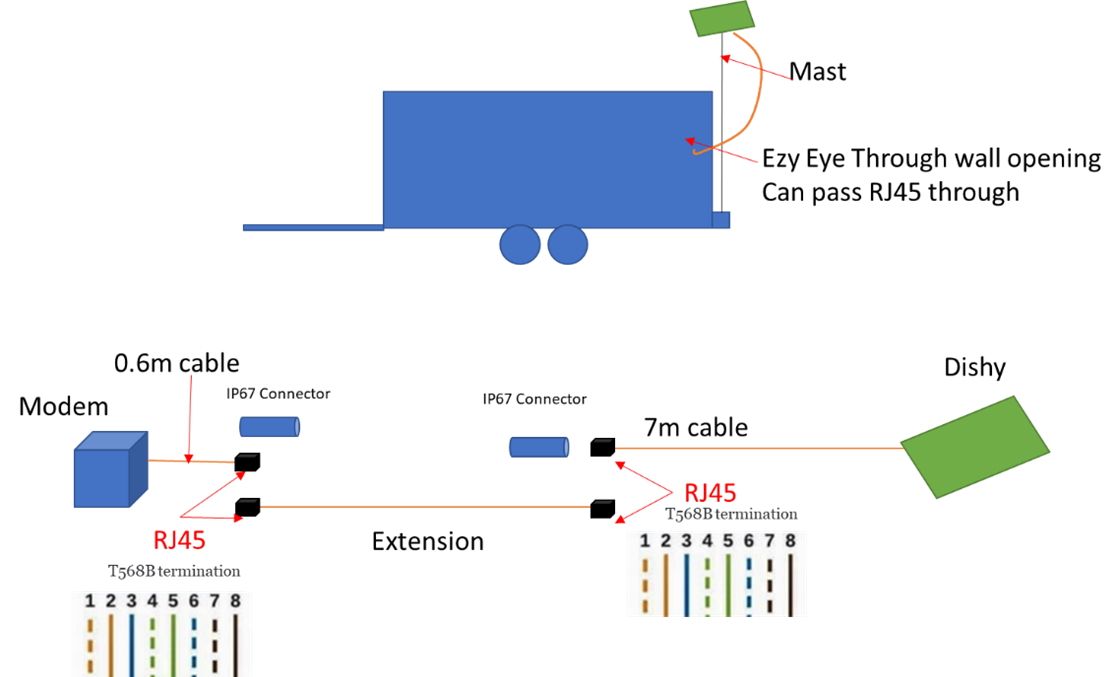
I have a 5.7m (about 18’) telescopic mast that I can insert into a mount on the back bumper of the van. I currently this use to hold an antenna that (depending on how I connect it up) can either receive 4G or WiFi – that’s a whole other story! The cables that I run from that antenna (either ultra-low loss coax [4G] or cat6 [WiFi]) pass through to the inside of the van through an Ezy Eye. This is basically a hollow tube that I can cap off when travelling. I was hoping to use that same Ezy Eye for Starlink, BUT the proprietary plug is JUST too big ☹. I actually tried to contact the manufacturer of Eze Eye to see if I could get a larger diameter tube, but sadly no reply.
My solution was to cut the Starlink wire into three sections and have it fitted with RJ45s (which I knew could fit through the Eze Eye):
- A short one that would always stay inside the van and be connected to the modem
- A long piece that I could use as an extension if needed, and
- A piece that was long enough to go from the top of the pole (dishy), through the Eze Eye and connect to the internal short wire with a joiner.
I got stuck into that and had the cable cut and new RJ45s fitted (by professionals, to my spec), and got appropriate joiners.
My plan was that I would then run the system using the 2600W inverter in my van. (See diagram below)
A bit more thought… and more options become available
Then I started thinking about running it on 12v. Since I had already cut the cable and gone beyond the point of no return, I could experiment with the 12v option as I could always revert back to my original idea. It was only going to cost money and a bit of research.
Standing on the shoulders of giants…
Just so you don’t think I came up with this idea, I did not. Almost all of the ideas and technical knowledge here I gleaned from searching for detailed hacks on the Internet, modified to suit my particular needs. Kudos to others. Most of this has been gained from https://www.offgridcto.com/2022/05/23/starlink-on-pure-dc-power/ and https://gist.github.com/darconeous/8c7899c4d2f849b881d6c43be55066ee . There is also a great video which I found AFTER I had come up with the design, that goes through the process at https://www.youtube.com/watch?v=iCrgNgrSPEw but unfortunately, it’s in Taiwanese (I think). You can use the closed captions feature and automatic translation to get a reasonable understanding of what’s said. You can send questions and he does reply in English.
High level overview
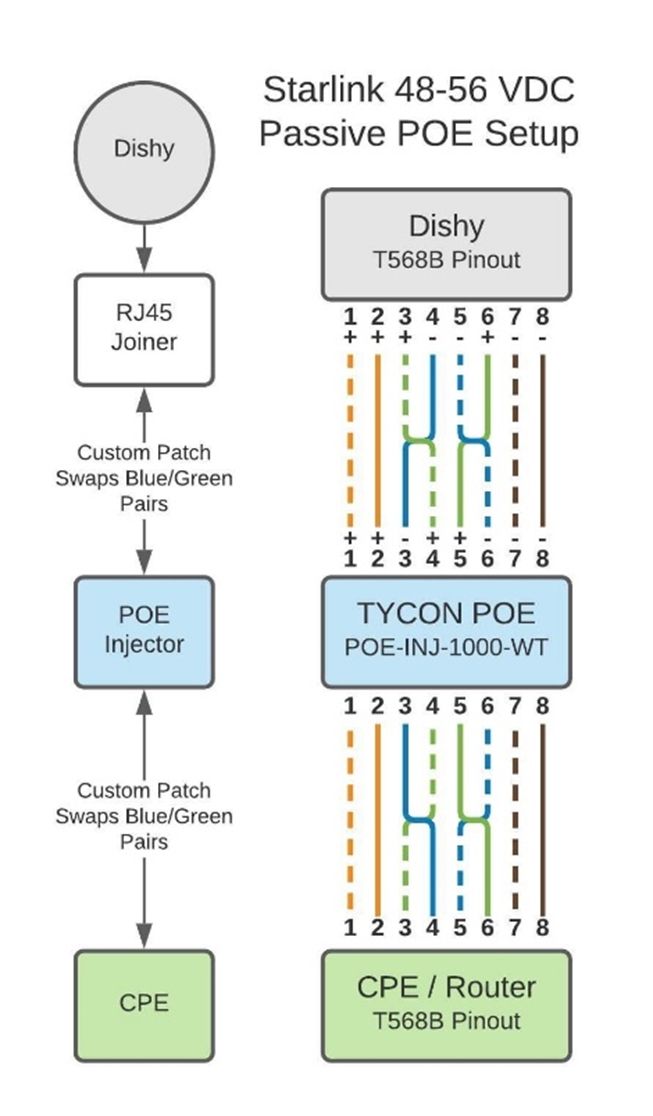
This involves hacking the cable that goes to the dish, inserting a new Power Over Ethernet (POE) injector (which requires a 12->48v booster as well) and also buying/providing your own router. Sounds simple enough…
BUT FIRST...
You need to fire up your Starlink router plugged into 110/240v (like you would do at home) and go to the settings page on the app and choose "Bypass Mode". This effectively takes the old router out of the game. Please note that if you ever want to put it back into 'normal' mode (and remove the bypass) then you have to do a factory reset!
In Australia (apart from cold areas where I won't be in winter) we don't get much snow. So while you are there also turn off the setting that heats the dish in case of snow.
That done? Then on we go...
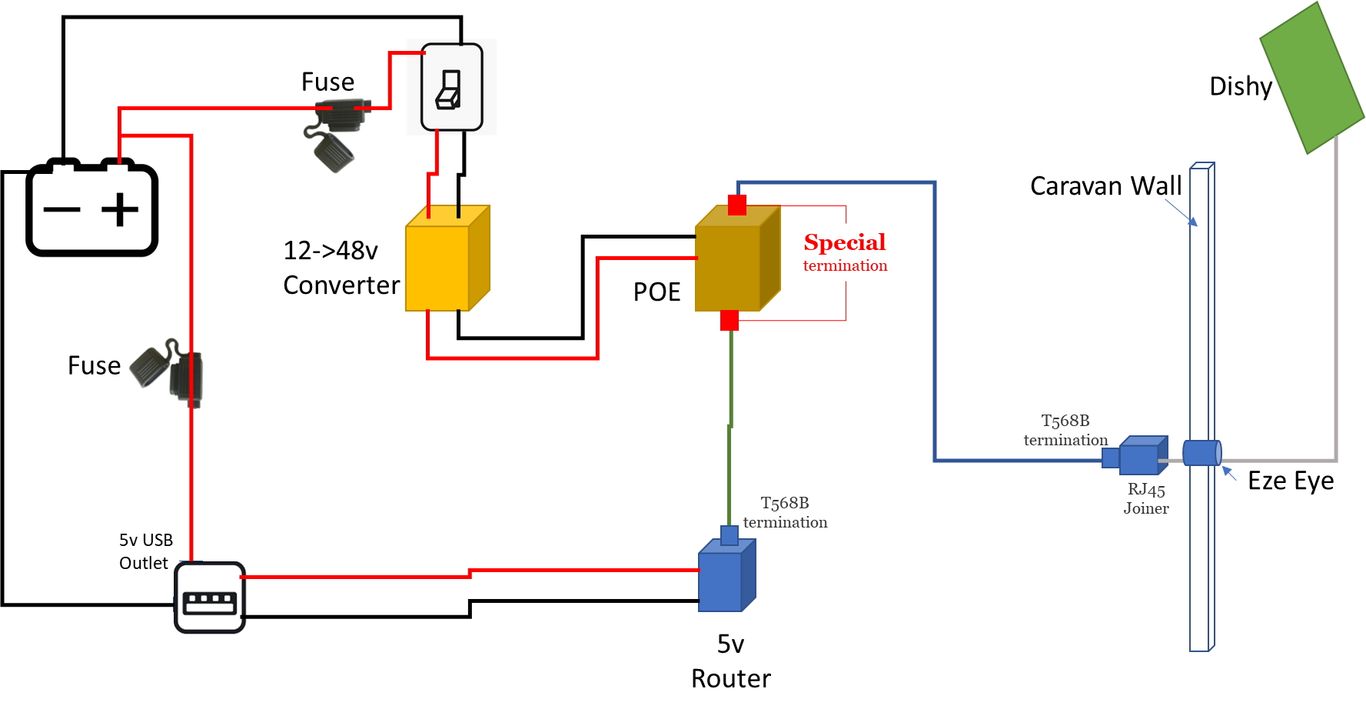
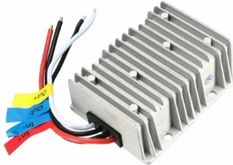
12->48v booster
First, I added a 12v->48v boost converter. (cost Au$58.46 plus fitting)
I decided to get this done by my friendly auto electrician as:
- I was busy with other things
- I wanted it done right first time (not that I am saying I make mistakes all the time - much)
- I wanted them to install a fuse to protect the system
- I wanted them to put in a switch so I could isolate the power if I wanted.
Waterproof DC 12V to DC 48V 8A Step-Up Booster Power Converter Regulator
This then connects to the inputs on the POE injector.
Power Over Ethernet Injector
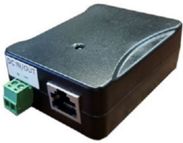
The POE Injector I chose to use is the Tycon Power POE-INJ-1000-WT Cost Au$38.29 incl freight.
Starlink uses POE to power dishy. It means we don’t have to run a power cord to the dish, which is a GOOD thing! It takes a fair bit of power (at least 48V) and so uses all four pairs of wire in a shielded Cat6 ethernet cable (most low powered POE only use two pairs).
The interesting thing about Starlink is they (for some reason) crossed over the blue and green wires from the standard. Don’t ask me, maybe someone is colour blind! What it means is we need to create CUSTOM ethernet cables!
Be very sure to mark each end of these special cables as to where each goes and…
DON’T USE THESE CABLES FOR ANYTHING ELSE!
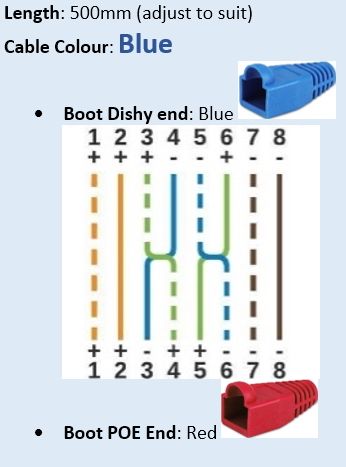
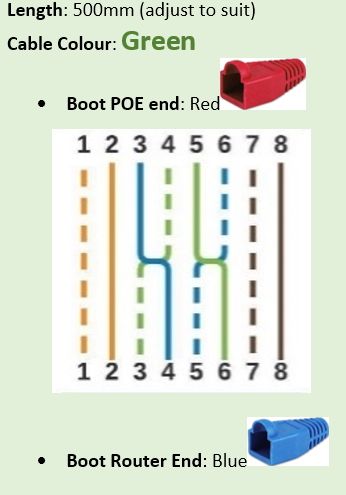
The simple way to set this up is to use coloured cables and coloured ‘boots’ to show the different cables and ends. For example, the POE ends could be red and the other blue (router and dish ends). Choose yourself and have it made that way.
The way I did it (just a suggestion) is:
Two special cables.
Copy and give this section to your friendly data cabler and get them to make it up (if you can’t do it yourself!).
Specs:
- Shielded Cat6 - minimum 24AWG (23 AWG preferred)
- Shielded RJ45 Connections
Cable 1 – POE->Dishy Connection
Cable 2 – POE->Router Connection
The Router
I then plug the special cable from the POE injector directly into the WAN port on my standalone mini 5v router/WiFi Access Point.
You can use a router of your choice, but in my case, I wanted a low powered one for the caravan, so I chose GL.iNet GL-AXT1800 (Slate AX) Portable Wi-Fi 6 Travel Router. Cost Au$189. You COULD go with something cheaper. I wanted very high throughput and lots of features. I suggest you shop around. I can just plug this into one of my existing 5v (USB) outlets and I have it powered up.
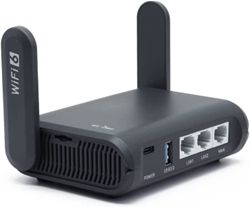
In practice this router gives me flexibility. It runs on OpenWrt (which means it’s very configurable, but has a basic interface for the less technical people as well), has high speed throughput, VPN and two gigabit LAN connections. I can also take the router with me when I travel for work overseas as an extra security device in hotels (bonus 😊).
Before I used the router, I set a fixed IP address on the router WAN port to 192.168.100.2 . The I set the LAN Address to 192.168.100.3 and have DHCP addresses up from 192.168.100.4. This means that the Starlink app and web page for configuring the unit would work from my phone.
Configure up the WiFi SSID and password to your heart’s desire (plus any other settings you need) and you are good to go.
Have the router on and working before powering up Dishy.
Plug in Dishy
Lastly, connect the cable from the POE end to dishy. You may require a joiner (like me) or, if you choose, you can use a surge protector, such as this one from Amazon (though it does require grounding to be fully effective). Hit the switch connected to the 12v->48v booster to power on and walk outside and see if the dishy does its thing and moves around (it can take a minute or two, so be patient). If so, all is good.
Joiners
To make sure everything is weather proof I also use IP67 rated shielded rj45 joiners for anything that is outside the van. Inside I just use normal joiners.
Speed
Well, in remote Australia (where I like to be) ANY speed is good, as mostly there is ZERO Internet out here. Of course, it depends on location and time of day. I have seen speeds between 197Mb/sec to 70Mb/sec down (plus the very occasional dropouts). Your results will be different.
Overall Result
I am very pleased with the outcome. I have regularly been on video conference calls with clients around the world, with no problems at all 😊.
Follow-on Note
Just a quick note to say that I did keep my Starlink router, power cable and the extension cable. Why? Well, if I ever need to reset the router then I can plug it back together and just blow away the setup and start again. Also, if I ever wanted to sell the system (and maybe upgrade to OneWeb [if it ever gets off the ground and turns out to be better]), then I can do that. I have found an appropriate place in the van to store the stuff so it won’t get damaged, but it is out of the way. I also kept the cut out extension cord for Starlink which means I can park under trees when it's hot and place the dish away from the van.
In the next 12 months I also have plans to set up OPENNDS (not OPENDNS) on the travel router to allow me to share my internet connection with other campers using a voucher system (which means I can control, and even potentially sell, access). I will write up a separate page for that. Watch this space 😊.
Got a comment?
Let us know if this was helpful...