OpenNDS, as distinct from OpenDNS, stands for Open Network Demarcation System. OpenNDS is a system that allows you to set up a captive portal on your network and (with a bit of jiggery/pokery) configure it to allow external users share your bandwidth. Whilst you CAN sell your excess bandwidth to other users, this is NOT the current focus of OpenNDS.
As a roving (not raving) cyber security specialist I am keen for people I run into being able to securely access the Internet. I implemented the system so as to be able to (securely) share my excess bandwidth. I have taken the time to secure my connection (as best as is possible), and making that available to others that share my passions is important to me.
So... How do I set this up? Well, I am glad you asked :-)
Here are my notes on setting up OpenNDS using the equipment and systems I already have...
Installing OpenNDS on gl.1800ATX Router
Introduction
The process below worked for me, but may change over time as the firmware for the modem is updates and the application is changed.
There was a fair bit of trial and error to get here...
In general terms the things you need to look out for include:
- The wireless interface for the web gets closed when you install the software making it appear that you have bricked the device. Plow on!!
- You MUST have an SSH client BEFORE you start – I used Putty.
- You need an Internet connection
- You need to know how to use a command line editor in linux (nano, vi, vim, etc) – google it if you need to know how.
A good resource is https://opennds.readthedocs.io/en/stable/install.html
The install...
This is using hardware I already have, mentioned in other posts. In this case the gl.1800ATX Router. If you use different routers then make sure it can run under OpenWRT and get that running before you attempt this.
I recommend going from a fresh install (hold the reset button down for over 10 seconds until the blue light on the top is flashing fast). This ensures that other extensions are not going to impact/interfere.
I started with a WIRED CONNECTION. For that you will need a fixed IP address of 192.168.8 100 and a Netmask of 255.255.255.0 on your PC/Mac/Chromebook/Linux. I will assume a PC from here on in.
In a browser on your PC, open the web interface at http://192.168.8.1 Set up the language and the password (if you reset).
I used the repeater setting on the router to join onto my existing network.
On the router set up the two MAIN wireless interfaces (give them a name and a password you can remember).
Set up the guest wireless networks with open security (OpenNDS will be your security)!
Open putty as root (uses same password as the web interface) and connect to 192.168.8.1 and enter the root password.
Type opkg update and press enter
Type opkg install opennds and press enter
Type service opennds stop and press enter – what this does is to stop the service so we can configure it 😊 This is where I ran into some issues to start with as the running service stopped me from connecting wirelessly to manage/configure the newly installed service – a bit of a catch 22.
OK at this point you can disconnect the ethernet and connect to the main wireless interface – do this now so your putty session can continue over the air (you may have to restart the session).
You now need to work out the interface to which you need to connect. The interface which the system runs on by default is br-lan.
To find yours type ifconfig and press enter
The list is longer than shown below…
The one I wanted it to run on was br-guest. To modify this (in putty) edit the file /etc/config/opennds (using VIM or VI or your choice of editor). You need to scroll down uncomment the line (by removing the #) that says #option gatewayinterface ‘br-lan’ and change br-lan to br-guest. See the corrected line below.
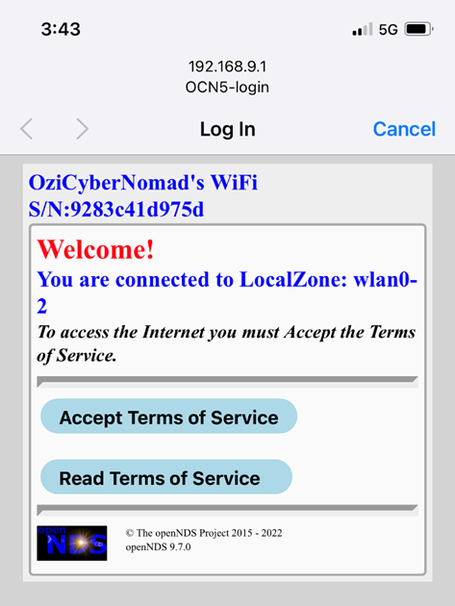
Next, we may as well change the gateway name while we are here. Scroll down to find GatewayName. Read the comments and then change the name to suit. You can see I have changed the name to OziCyberNomad’s Wifi – using the special format they require.
OK at this point we can restart the service. Type service opennds start and press enter
And now we can test to see if our magic works 😊
Notice at this stage there is no voucher details being asked for. That comes later… The main thing is the captive portal is working.
We can customise the landing page.
Now because there is currently no protection on that connection, I suggest you go into putty and type service opennds stop and press enter and also go back into the web interface and stop the guest networks. What comes next takes a while and we don’t want others using our network in the meantime.
It should now be running with a simple "click to continue" splash page sequence.
Test it by connecting with your smartphone or tablet and you should get the "popup" login screen.
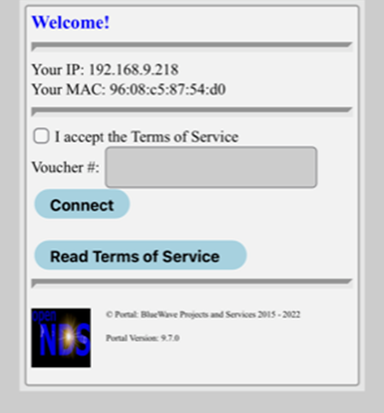
Now you need to download the Community "Voucher script" and "Voucher Roll"
Use the following commands:
- cd /usr/lib/opennds
- wget https://raw.githubusercontent.com/openNDS/openNDS/master/community/themespec/theme_voucher/theme_voucher.sh
- cd /tmp/ndslog
- wget https://raw.githubusercontent.com/openNDS/openNDS/master/community/themespec/theme_voucher/vouchers.txt
Now you need to activate the voucher script.
Use the following commands:
- chmod 744 /usr/lib/opennds/theme_voucher.sh
- uci set opennds.@opennds[0].login_option_enabled='3'
- uci set opennds.@opennds[0].themespec_path='/usr/lib/opennds/theme_voucher.sh'
- uci commit opennds
- service opennds restart
OpenNDS should now be running the voucher script.
Test it by connecting again with your phone or tablet.
You will need a voucher code from the example vouchers.txt file you downloaded.
At this point it is safe to leave the system running as there is some form of protection (albeit the standard vouchers copied over from the Internet)
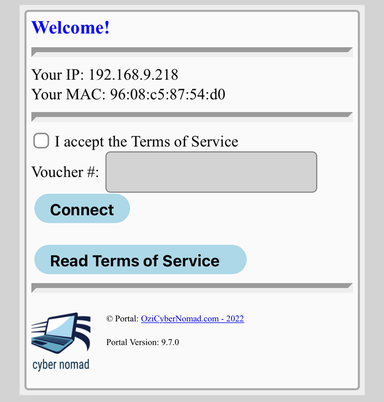
Now to customise it a bit…
First go to /usr/lib/opennds and modify theme.voucher.sh
Search for portal and replace Blue Wave Projects and Services 2015 with your domain (insert it in an HREF if desired). Save.
Upload a new splash screen image to /etc/opennds/htdocs/images/splash.jpg and it becomes…
You need to test it with some of the vouchers and check that it lets you in. The user should now accept the terms and enter the voucher… Ok it SHOULD now be working.
The next step (yes, the story continues) is to generate your vouchers…
Vouchers
In order to generate new vouchers, you need two things:
- a script
- a program to run the script.
In both cases they are very easy to get from the internet.
The script you can get from https://raw.githubusercontent.com/openNDS/openNDS/master/community/themespec/theme_voucher/voucher_generator.py
The program, I recommend downloading the python application from https://www.python.org/downloads/ . Hint – you may need to install it as an administrator.
Below is a copy of the script with a few explanations (comments are after the #):
# Hotspot Voucher Generator
import random
import string
rate_down=5120 # in Bits so this is 5Mb/s download (plenty for youtube)
rate_up=1024 # in bits so this is 1Mb/s upload
quota_down=5120 # in MB so this is 5GB
quota_up=0
validity=7200 #minutes
voucher_qty=20 # adjust as needed
def randomstring(length=4):
letters = string.ascii_uppercase + string.digits
return "".join(random.choice(letters) for i in range(length))
def new_voucher():
voucher_code = f"{randomstring()}-{randomstring()}"
return f"{voucher_code},{rate_down},{rate_up},{quota_down},{quota_up},{validity},0\n"
filepath="vouchers.txt"
with open(filepath, "a") as voucher_file:
for i in range(voucher_qty):
voucher_file.write(new_voucher())
To run the script, open an administrator level command prompt. Navigate to where you have the script and type python voucher_generator.py
It only takes a second and a new file called voucher.txt is created. Copy the contents to the voucher.txt file on the router and you are good to go.
If you want to get fancy then you can open the voucher.txt file in excel and use that to create a maailmerge/form letter that you can give/sell to clients with the details. Over to you for that!
Terms of Service
One important step to do is to review the provided Terms of Service. They are hidden in a script so…
Using an ssh session on the router open /usr/lib/opennds/theme_voucher.sh
You will need to scroll down a fair way and read the terms. Don’t like them, then edit/create your own and follow the same format.
Storage of Logs and Voucher.txt file
We need to have a system that protects the logs and the voucher.txt file from the RAM of the router. For that we use a USB. In order to get the USB ready, follow the instructions at https://openwrt.org/docs/guide-user/storage/usb-drives
Set up USB for vouchers and logs – A work in progress!
Backup
Now that you have finished the setup and everything is working – BACKUP!!!