Please be aware that this is a LOOOOONG Document! You might want to print it!
The Concept
We have an off-road caravan designed to allow us to explore the Australian bush and “get away from it all”. I wanted a system for our caravan that would boost Wi-Fi and 4G signals when we were “remote” (or not immediately local to a signal). Note that it needed to cater for BOTH 4G AND WI-FI.
After some research, I found an article at http://mvvikingstar.blogspot.com.au/2014/02/Wi-Fi-repeater-for-boat-update.html which helped me solve the problem. I have made my own twists on this system to suit myself but most of the kudos goes to “Viking Star”.
The most significant change was to bring the Bullet inside the van. I did this because:
- Coax is better in the weather than Ethernet
- It’s better weather protection for the Bullet
- I can factory reset the Bullet quickly
- I can choose to plug in the Bullet OR a 4G modem (if Wi-Fi is out of range).
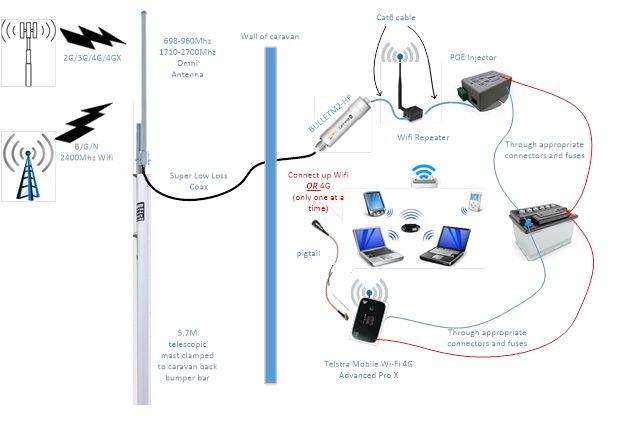
A word of warning… If you are going to do this then take a lot of time to make sure you have the right connectors at each end. It gets confusing and a diagram (such as the one below) helps to make sure that each cable/device will connect correctly.
My overall schematic looks like:
Wi-Fi
For the Wi-Fi configuration, I followed the ‘Viking Star’ instructions below (except I changed the IP addresses – and no, I am not going to tell you what my IP addresses are 😉).
Wi-Fi was designed to make that last 50-100' IP connection wirelessly. It’s universally supported worldwide often with no government licensing required. Using better antennas and sensitive receivers we are able to stretch this 50-100' limit to a mile or better. This repeater will use a high gain antenna combined with a sensitive receiver* to 'receive' the Wi-Fi single we are interested in; run this down a cable to inside the caravan and then 're-transmit*' it, using another hot-spot for our local use.
The real key here is the 'receiver' (more correctly called a Client or sometimes Station). It needs to have extra big ears to hear the weak Wi-Fi signal we want to lock into, as well as a big mouth to shout back "OK, I Got it!". This updated repeater simplifies the parts uses, as well as the assemble steps; just need to be clicked together. Then a few simple (and one not so simple) configuration step and you are done! Here is an overview of where this is heading:
* I know the words Transmitter and Receiver are not being used properly here, but I thought it might better explain things. The correct words are: Access Point and Client or Station.
The Parts
Like most repeaters, this one is built up around the Ubiquiti Bullet-M2-HP and a moderate gain antenna. I also fit up the ‘caravan end' with a newly released device called the airGateway LR. A low cost PoE injector will simplify the connection to 12v DC power.
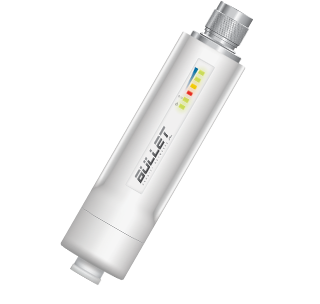
Ubiquiti Bullet M2-HP
The core of the repeater is the Ubiquiti Networks Bullet. Low cost, high performance, and good sensitivity make this item hard to beat. I still think the standard one (vs. the Titanium series) is a good choice - it will be all wrapped up and water-proofed below.
Don't be fooled by others talking about 'marine quality', or other nonsense. What we need to make a good repeater is the ability to hear very faint signals (receiver sensitivity), combined with the ability to shout loud enough to be heard over a distance (good transmitting power). The bullet had that, and more important it is design to commercial specs (as opposed to 'consumer' specs for most all USB connected devices). This is 'Electronics Speak' meaning the Bullet is design to operate in a wider range of temperatures and often included additional robustness in the basic design. This is the one you want.
Do make sure to get the Bullet-M2HP version. There are other variations (ala, Bullet-5HP, Bullet-2, etc) that are not what we want here.
I got my Bullet from https://www.myithub.com.au/Ubiquiti-24GhzBullet-P66936.aspx?afid=8&gclid=CMH-mKbww9ICFVgjvQodIhMPkw $109.73 plus postage.
Note there is a different bullet for the 5ghz range. If you want to cover all possibilities then buy both, but you would also need a different/extra antenna.
8 - 9dbi Omni-directional Antenna
This is the other key to our system: a good antenna. In fact, of all the components the Antenna likely is the most critical part to make this system work. See - it really is all about being able to hear faint signals, and the antenna's "gain" gives us better ears.
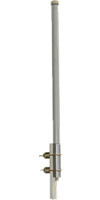
The antenna I found was a beauty. Remember that I want both Wi-Fi AND 4G. I found an antenna from Telcoanntennas that satisfies my needs. See https://www.telcoantennas.com.au/site/telco-omni-3g-4g-4gx-antenna-700-2700mhz
Note that this one does ALL the current 4G ranges including the new 700Mhz low frequency range that is going to support 5G, PLUS the 2400Mhz WI-FI range. It’s a bit of a monster in terms of size at 1.5m long but it IS worth it. Price is about AU$210.
AirGateway LR+ PoE Injector
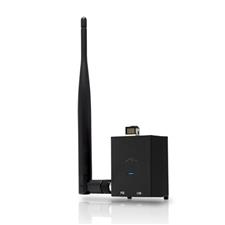
The AirGateway LR. Nice little device for under $45! Combining it with a low cost PoE injector cable and the end results is more compact, and SOO much simpler the trying to modify an old WRT-54G router! This item was given to me as a present so I am not sure where it was obtained from. Try https://www.mwave.com.au/product/ubiquiti-networks-airgatewaylr-80211-bgn-Wi-Fi-solution-ab68709?gclid=COvq6pbK-9MCFZcjvQod7OYKxQ
POE injector:
This is where I diverge a little from Viking Star. When I am not connected to mains power (and ‘out bush’) we need something that is 12v so our batteries and solar can continue to provide us with power. Well, I needed something that could plug into a standard cigarette lighter plug and provide a 12v power source that provide Power Over Ethernet (POE)**. So I went to http://www.ubiquitishop.com.au/ and got the Power over Ethernet device (see http://www.ubiquitishop.com.au/131_42_poe_1port.product ) plus the 12v adapter (see http://www.ubiquitishop.com.au/292_0_car_cigarette_lighter_to_dc_power_adapter_cable_black.product ).
** PoE: Power Over Ethernet - is a way to send DC power up to the Bullet over the same cable used to communicate with the Bullet.
Low Loss Coax
This is again where we diverge a little from Viking Star. Viking Star has the bullet directly attached to the antenna. However, I wanted to be able to change the bullet over to a 4G device (see later) and I didn’t want to have to bring the mast down each time I wanted to make the change. So, I use a 5m length of LCU400 (low loss) Coaxial Cable with an N Male connection for the antenna end and an SMA Male connector fitted that passes through a special hole in the caravan wall. This means I have fewer connections and therefore less potential for loss. However, it does mean I need a fly lead to go from the coax to the top of the bullet (and to the 4G modem). The cables I bought again were from Telcoantennas. SMA Female to N Female Bulkhead Patch Lead - 15cm Cable (total price $85 – I know it sounds expensive but quality does cost, and it’s worth it in the long run).
"Eze Eye" Through-the-Wall Caravan System
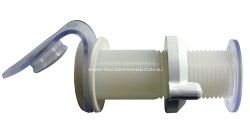
Caravan wall connections are notorious for loose or corroded terminals, which result in loss of signal and poor quality. Most wall connections have at least 3 contact points and even when properly maintained, still result in loss of signal. The Mini Compact "Eze Eye" eliminates these problems.
The "Eze Eye" is designed so the coax cable can run directly from the antenna, through the "Eze Eye" and to the internal devices without any other connections required. Supplied with a rubber grommet to protect water intrusion (not pictured).
You will need to cut a 22mm hole in your caravan, the Inner Dimension of Ezy Eye is 15mm.
Cost $35.00
The Configuration
Here is perhaps the hardest part of rolling your own vs. purchasing a pre-made kit. We need to configure both the Bullet and the airGateway LR from their as-shipped default configuration... It is not hard, and I have included screen shots for each step. But it does take a few steps. Let’s get started.
In short, we are going to configure the Bullet to act as a 'receiver' for an access point some distance away, and configure the airGateway LR to provide a local Wi-Fi hot-spot on our caravan re-transmitting that distant station. Once that is done we can connect them together, do the install on your boat/caravan, and then make some final tuning changes. From that point on you are done and ready to tap into Wi-Fi's around the world!
The Hard Part.
The next section is a straight take from ‘Viking Star’, including their IP addresses.
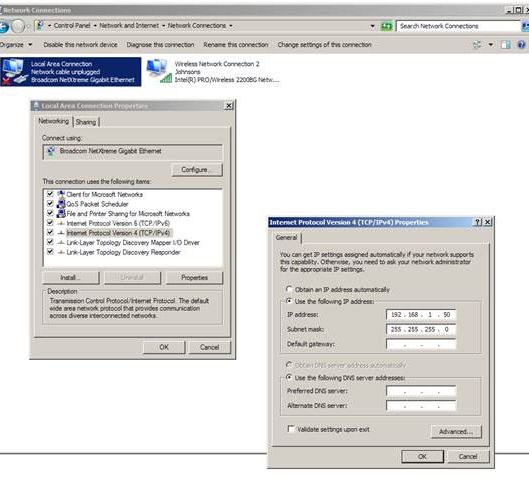
I have been saving this one for a long as I can. There is one step that is, to be honest, not so straight forward. Being as the Ubiquiti devices are design for light commercial installations, as opposed to simple consumer installs, some things are a bit fiddly. And here is one: In order to be able to 'talk' to the Bullet and initially configure it, we need to temporarily configure your computer for a fixed IP address... In Ubiquiti's own words:
- Make sure that your host machine is connected to the LAN that is connected to the Bullet.
- Configure the Ethernet adapter on your host system with a static IP address on the 192.168.1.x subnet. (e.g.: 192.168.1.50)
- Launch your web browser. Type https://192.168.1.20 in the address field and press enter (PC) or return (Mac).
OK. Step by step. First off you need to figure out how to 'Configure the Ethernet adapter in your host system with a static IP address on the 192.168.1.x subnet'.. Each computer / OS will be a little different. Google up "configure for static IP address". For example, I typed in: "configure winXP for static IP address" and came up with tons of hits, like this one: http://www.howtogeek.com/howto/19249/how-to-assign-a-static-ip-address-in-xp-vista-or-windows-7/
Once you find some instructions that make sense to you, you might want to print them out - as once we do this change your computer will no longer be able to access the Internet. Also, take good notes on what you did as you will want to 'undo' them once the Bullet is configured. And do not worry, this is a one-time thing! Once we get the Bullet initially configured, there will be no need for these manual steps.
No matter which set of instructions you follow you want to make sure you set the IP address of your computer's hardwired Ethernet socket to: 192.168.1.50 (It needs to be the wired Ethernet socket, not some other adapter - ala a Wi-Fi adapter, that we change). The link above used 192.168.2.2 and 192.168.2.4. Those will not work for us. We need 192.168.1.50 - just follow the steps by step guide, but use 192.168.1.50 every time they call for 192.168.2.2 or 192.168.2.4! All the other steps and numbers are OK to use.
Here is a winXP only example that does exactly what we want: http://www.hotcomm.com/FAQ/FAQ_staticIPXP.asp Skip down to the "Assign the IP address part"
Simple, right!
And for win7, here is a snapshot of what you might be looking at:
Once we have the computer set up for a static IP address we need to isolate your computer from any existing network. Turn off the Wi-Fi, and / or disconnect any Ethernet cable coming into your computer.
Now we can get down to actually doing the per-configurations.
Pre-configuring the Bullet
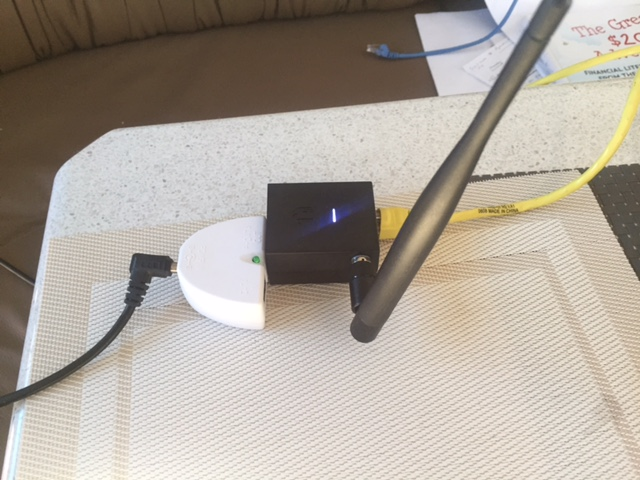
In these steps, we are going to turn the bullet into a 'receiver' (more correctly, a 'Station'). To do this you need to run an Ethernet cable from the bottom of the bullet to the socket on the PoE adapter. Plug the other end of the PoE adapter into your computer and the 12v power brick into the DC connector. It should look something like this:
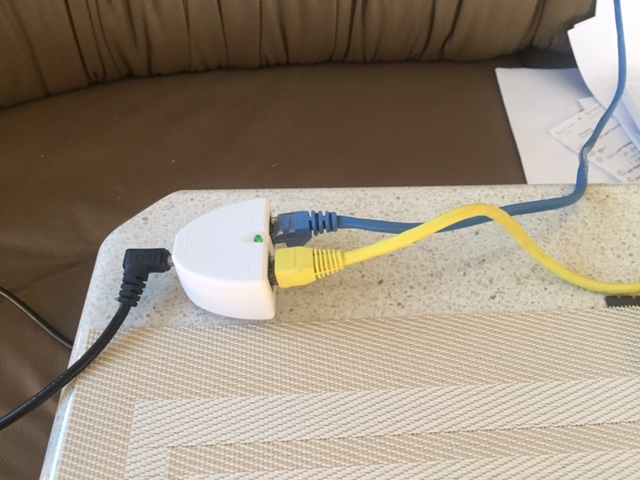
The black cable on the left goes to a 12v power source. The Blue Ethernet cable on the top goes to the Bullet (providing POE), Yellow Ethernet cable closest to the camera plugs into the computer on the right.
Before we dive in, two quick notes:
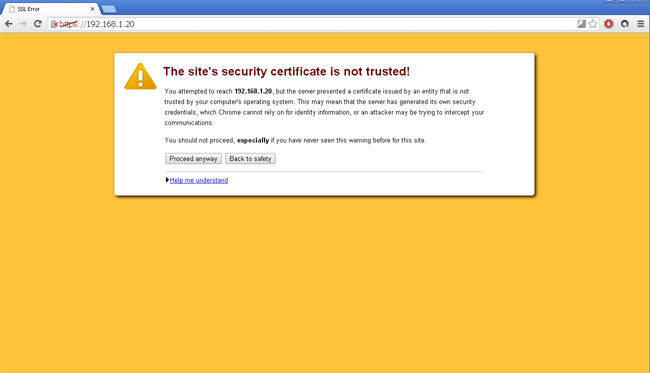
- It is likely you will get a warning about Rome Burning on your computer - This is an SSL warning, and it is occurring because the Bullet is telling the computer 'I am safe', as opposed to some outside trusted 3rd party (remember we cutoff the Internet to your computer??). Your computer is designed not to trust things that themselves say 'I am OK', and so the warning.. As we know the Bullet can be trusted, click Proceed Anyway to continue. (If you want, most browsers have a way to add an SSL exception - you might want to do this later to eliminate having the click Proceed Anyway each time you log into the Bullet and/or the airGateway.)
- In the following examples you might notice the upper left hand corner talks about a Loco NanoStation instead of a Bullet M2-HP. At the end of this posting I will talk about some options, one of which is the NanoStation. The steps are the same for the Bullet and the NanoStation - so just follow the slides and think Bullet when you see NanoStation!
Onto the configuration…
Open up a browser on your computer and type in:
This will bring you to the Bullets configuration screen.
Once you get past the Warning the initial log-in screen will be shown:
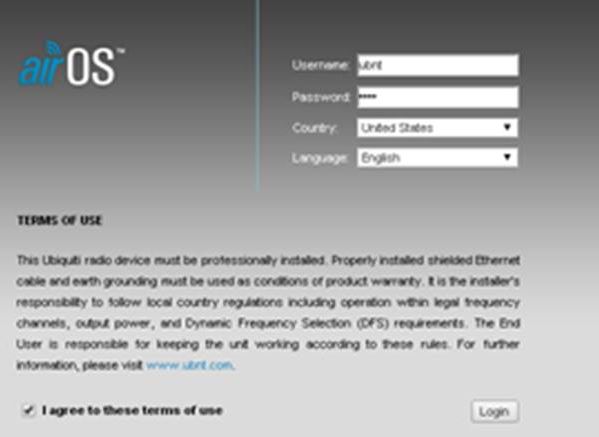
When 1st logging into the Bullet after a factor reset there are a few extra items to fill in, like the country you are in and your agreement to their Terms... Enter ubnt (lower case) for both the Username and the Password. Select the country you are in (Note on Country - Most Flexible is to select Australia) and your preferred language. Click the I Agree button and you will then be taken to the summary screen
** After logging in you will see the initial summary screen, the MAIN tab:
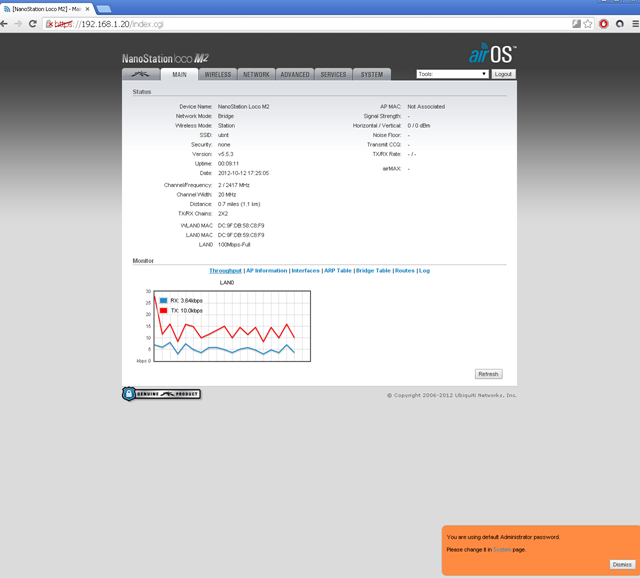
You can click on the Dismiss button in the orange window at the bottom right, we will get to changing the password in just a bit. But 1st, click on the NETWORK tab, which will bring up this screen:
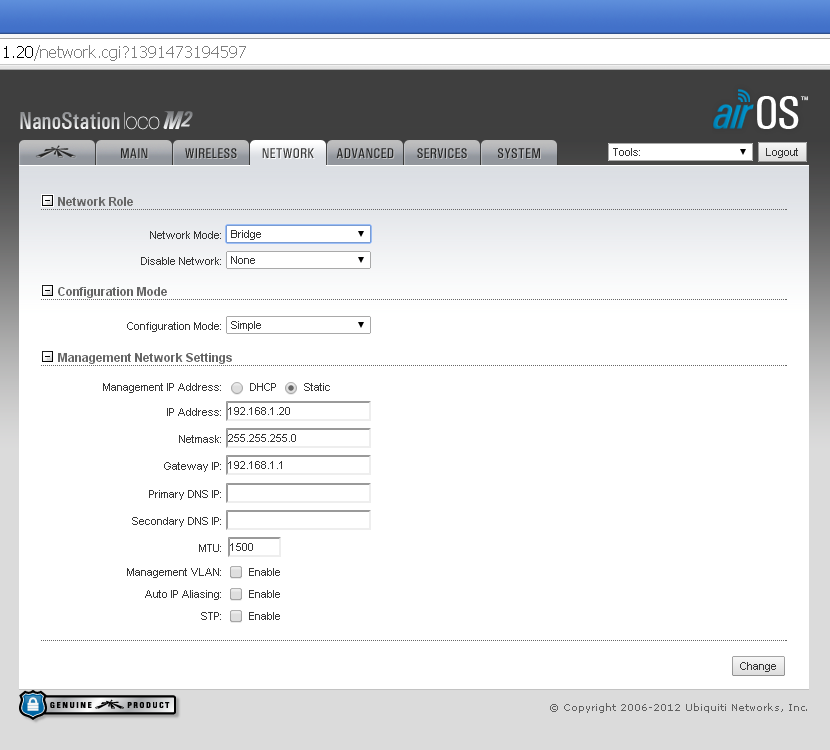
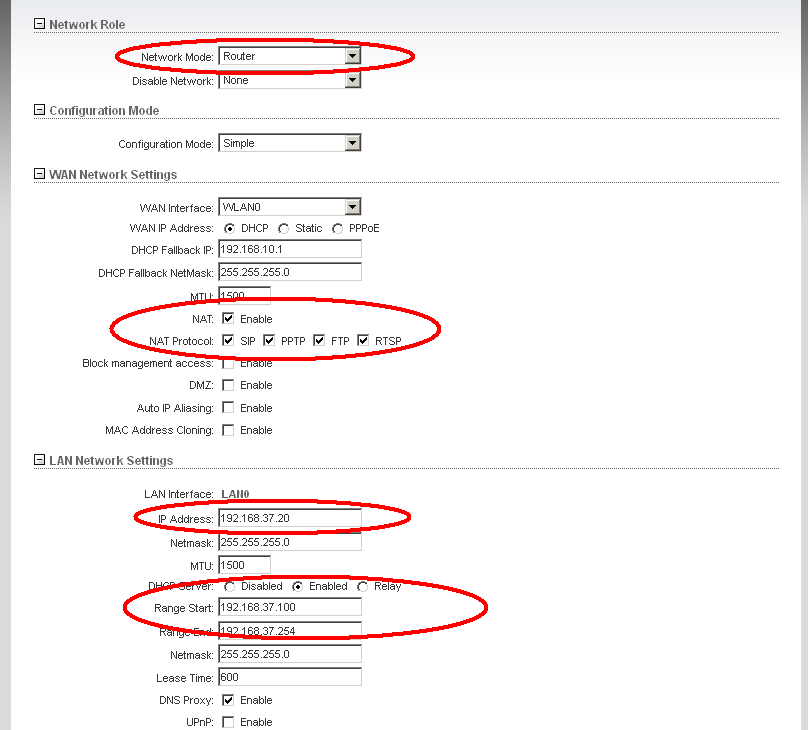
We want to make a few changes here, do these steps - in order:
- Change Network Mode from Bridge to Router.
- In the 'WAN Networks Settings' section, check the NAT - Enable box.
- In the 'LAN Network Settings' section, change the IP Address to 192.168.37.20
- In the same area, click the Enable button on the DHCP Server
- And also in the same area, change the Range Start to 192.168.37.100
- Optionally I would also change the Range End to 192.168.37.200 This gives a few high range numbers if you need them.
After you have these steps press the Change button on the lower right hand side. A blue bar will appear at the top. Do NOT press the Apply button in this blue bar yet, we still have some configurations changes to do 1st.
You should now see something like this:
Note that as before I am moving the Bullet away from the common IP address block of 192.168.1.x (as well as 192.168.0.x) and instead using 192.168.37.x I do this as I continue to have difficulties if I happen to connect to an external Wi-Fi which uses the same subnet block range as the repeater. Things just do not work well. And by moving to a subnet range that is unlikely to be seen (192.168.37.x in this case) I reduce greatly the risk of running across an external Wi-Fi Access Point which uses the same range.
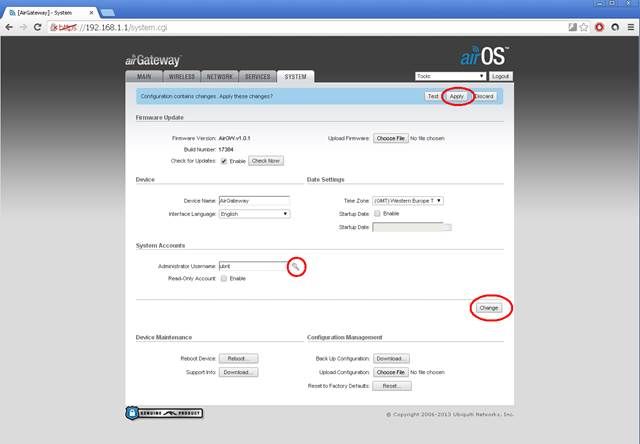
Moving on, press the SYSTEMS button to bring up this screen, and we will now change the password:
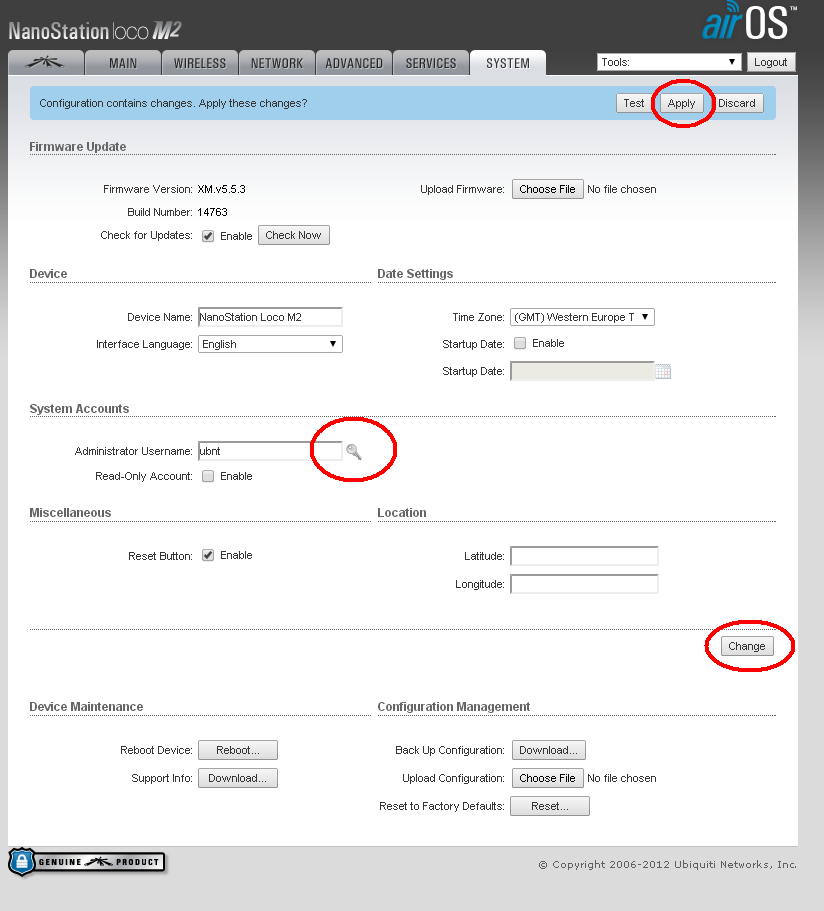
If you look very closely there is a small key-shaped icon just to the right of the 'Administrator Username' box (the one that has ubnt in it). Click on that 'key' and you will prompted to enter the old password (ubnt), and a new password of your choosing. Do that now. If you want, you can also change the username from ubnt.
After you have entered your new password and pressed OK, go ahead and press the Change button on the lowerish right hand side - and as we are NOW all done - you can also press the Apply button in the Blue Bar.
That’s it. You have completed the pre-configuration of the Bullet.
Next:
- Return your computer to its prior state by undoing the static IP address we did above.
- Unplug the PoE adapter from the computer as well as the Bullet, and also re-enable to Wi-Fi on your computer.
Once all this is done, let’s move on to the next step, and airGateway LR.
Pre-configure the airGateway
With your computer put back to normal (more or less – la , un-did the static IP address / re-enabled the Wi-Fi) we will now focus on the airGateway. This will be much simpler and we can even do it wireless! But 1st we need to get power into the airGateway. Unplug the Ethernet cable from the PoE injector that is leading to the Bullet and from the computer, but leave the 12V-dc power cable in place. Then if you look closely on the 'back end' of the airGateway there is a kind of Ethernet plug built into it. We want to plug this into the socket on the PoE adapter, kind of like this: (But don’t plug in the cable up to the Bullet, that comes later).
Once you have sent power to the airGateway give it a few seconds to wake up. Using your computers Wi-Fi tool look for a wireless network with the SSID of 'www.ubnt.com'. This is the default name for the airGateway. Go ahead and connect to it. Then open your browser and type in https://192.168.1.1
You will again get an SSL security warning message. As before click Proceed anyway to get to the initial login screen. As before, enter 'ubnt' for both the username and the password, select your country and language, check the I Agree box and click the Login button - you will be taken to a small 'wizard' overlaying the main screen tab:

We need to make a few more changes than the Wizard will allow, so click the Cancel button and we will go step by step.
After clicking Cancel, click on the Wireless tab.
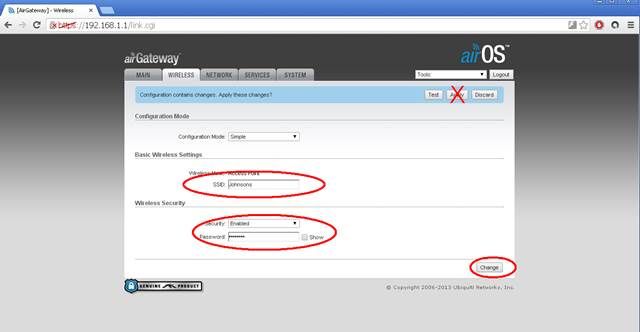
Change the SSID to something meaningful to your boat (I used Viking Star on our boat - and here I used Johnson). By default, WPA2 encryption is used, enter the password you want. You can disable wireless security if you want with the enable/disable pull down box. Your choice. Pressing Change in the lower right hand corner will bring up the Blue Bar, as before we will NOT press Accept until we complete out changes.
Move on to the NETWORK Tab. We need to do four things here:
- Change the Network Mode from SOHO Router to Bridge
- Change the Management IP address button from DHCP to Static
- Assign a fixed IP address of 192.168.37.10
- Set the gateway ip address as 192.168.37.20 (the address for the Bullet)
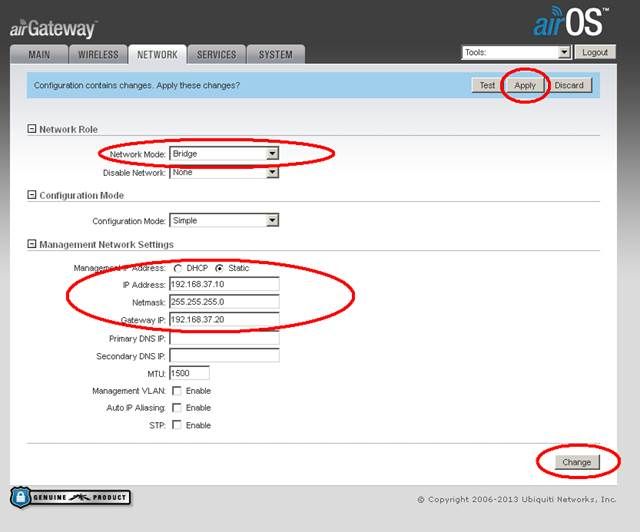
Again, press the Change button but hold off on the Apply one.
Move on to the System tab.
As with the Bullet, click the little key shaped symbol next to the Users name and type in a new password (remember, the existing default password is ubnt). Press the Change button on the lower right and go ahead and press the Accept button.
That’s it for the initial configuration. Let’s move on to installing your new Wi-Fi repeater!
The Installation
You want to mount the antenna outside about 3-5m off the water/ground. Or Find a good place as far away from any other electronic antennas as you can, and mount the antenna. To be honest, here is where some of the commercial kits help. At least one of them has made a special adapter to allow the antenna and Bullet to be screwed directly into a standard 1" antenna post. However, most antennas you get will use clamps. As with most things on a boat/caravan, time to be creative!
I wanted a mast on which to mount the antenna. Once again Telcoantennas to the rescue. As I will be moving the caravan around I needed something to allow easy set up. I chose a 5.7m telescopic mast and a trailer draw bar mount similar to the one below:
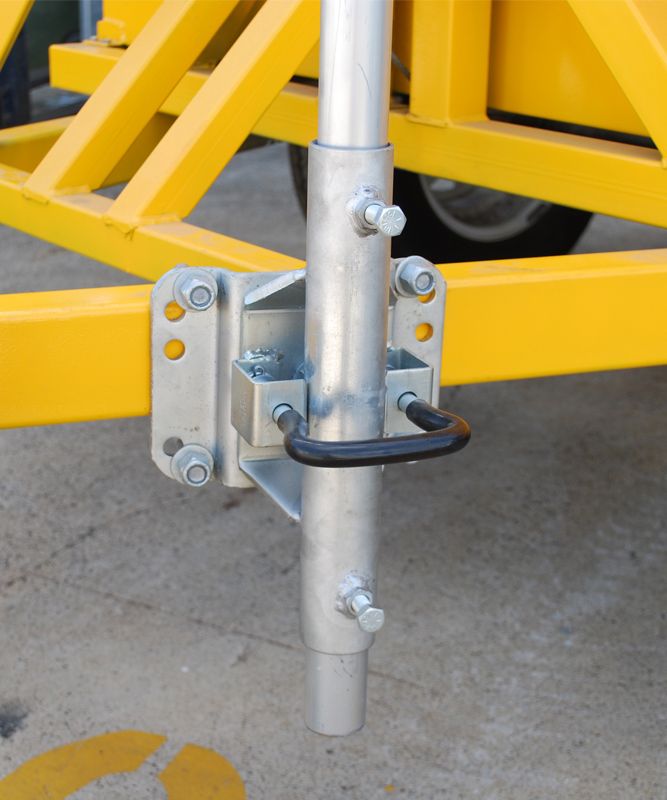
I fixed the draw bar mount on the rear bumper bar of the van. It was out of the way and close to where I needed the cable to come into the van. The bracket stays there permanently and I just put up the mast/antenna as needed. It takes about five minutes.
I connect the antenna to the mast, then the Low Loss cable to the antenna. I then lift the antenna into the bracket and put the cable through the wall and connect it to either the Bullet or the 4G modem.
If I am using Wi-Fi, I plug the CAT-5 cable into the airGateways socket labeled POE. Then plug the PoE adapter into the nub on the back of the airGateway - I used some electrical tape to make sure it was held on well. Also put some tape over the exposed Ethernet plug on the PoE injector, we will not be using that and want to make sure there are no accidental shorts.
Connect up the +12v or +24v DC by your house batteries, or if you want you can instead continue to use the Power Brick used during initial configuration. If you wire to your house batteries, make sure to add in a 2A inline fuse and an on/off switch. And finally put a wrap of electrician’s tape around the DC connector on the PoE injector- to make sure it does not come unplugged.
And there you have it!
Just a few loose ends to clean up and you will have a Wi-Fi repeater that preforms as well, or better, then commercial per-packaged systems for a fraction of the costs. But 1st, a couple loose ends.
Making it Waterproof
This next section doesn’t apply to me as I have moved the bullet inside, however I have left it in so that others may benefit. The instructions are from ‘Viking Star’.
Some time ago I captured these steps written by Bob Hrbek on how to properly tape up an external RF connector. The way the Pro's have done things for years on RF installations. His website is gone now, but I saved a copy and here is the gist of it:
- Use the Supper88 tape to make 'Courtesy Wrap's directly over the antenna connection and the place where the CAT-5 wire comes out the bottom. This is just a couple of turns of the tape which will aid in ungunking things if (when) you need to open things up in the future for servicing. Do not go wild on this, just a single layer a couple of tape widths wide is sufficient. Some folks put the tape on backwards (sticky side out) to work even better.
- Using the SCOTT 2210 mastic to cover everything up. Starting about 2 inches above the top of the Bullet antenna connector to a couple of inches below the CAT-5 cable. It is a self-fusing tape, pull it firm, make about 2 layers, and then mash it all together into a fused ball.
- Cover it all up with two wraps of the Super88 electrical tape from bottom to top (Always start at the bottom if you can). Making sure to go a bit higher on the antenna and start lower on the CAT-5 cable with each wrap.
In 10 years of outdoor use I have never had a problem with water intrusion. And yes, I did have to Unwrap things once, so was very happy I had put the Courtesy tape on. And here is perhaps one of the BIGGEST difference between what we do, and the per-configured systems. Making it waterproof!
A last Step
There is one more last-step we want to take before calling it done. We want to enable the Bullets Watch Dog. The reason for this is it will give us a simple way to 'reset to factory state' the Bullet if something ever goes sideways. Of course, another way is to climb up the mast, unwrap all the waterproofing and press the Reset button on the bullet. But I think the Watchdog is much simpler.
Power on your new repeater and give it a few seconds to power up. Using your computer search for the new wireless network you set up when configuring the airGateway (Johnson in my case). Select it and enter any password / security key. This is just like connecting to any other Wi-Fi network.
We want to get back to the Bullets management screen, so open a web browser and type in:
or whatever address you chose as the fixed IP for the Bullet.
If you have not added an SSL Security exception to your browser you will get that SSL warning. Click on OK to proceed (as you will often be going to the Bullet - you really might want to figure out how to add a permanent exception for your browser. Each is different, try searching for SSL Exception and your browsers name).
Go to the Bullets SERVICES tab. On the top left is the section called Ping Watchdog. Make the following changes:
1) Check the Enable box next to Ping Watchdog.
2) Type in 192.168.37.10 for the IP Address to Ping
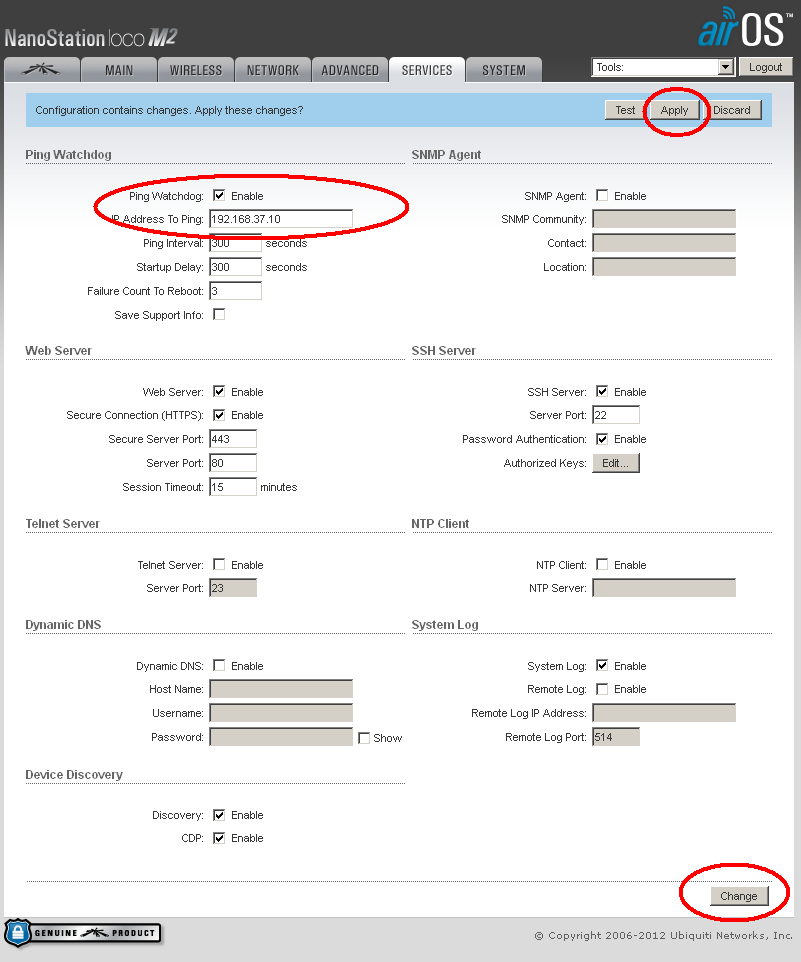
If you recall, 192.168.37.10 is the address we put the airGateway. If the Bullet can 'see' something at 192.168.37.10, all will be OK. But if it ever fails get a response when 'pinging' 192.168.37.10, the bullet will reset its self to the factor default. After 3 failed tries 300 seconds apart (or about 15 minutes).
Go ahead and press the Change button as well as the Apply button that will appear in the Blue Bar. That’s it!
If down the road you have some reason to reset the Bullet, all you need to do is press and hold the reset button on the airGateway for 10 seconds. That will reset the airGateway to its factory default (which was at 192.168.1.1); the Bullet will no longer get a response to its Ping requests, and after 15 minutes the bullet's Watchdog will timeout - resetting the Bullet to its factory state. Then you can start all over with the Pre-configuration steps!
Using the Repeater
Wow. We have installed our nice new repeater - how do we use it? Rather simple. Power it on and connect to the Wi-Fi name you set up for your boat (Johnsons in my example). Open a browser and type in https://192.168.37.20 to gain access to the Bullets management screen. If you still have not put in an exception for the SSL error, go ahead and click through the Proceed button to get to the main screen and the select the WIRELESS tab. Click on the 'Select' button to the right the box labeled SSID and the Bullet will do a site survey of all Wi-Fi networks it can see. This is what I got with one survey:

You can see not only the new Wi-Fi we created for our local use (Johnsons), but also any other Wi-Fi in about a 1 mile (1.6km) radius. Click the circle to the left of the network you wish to use and then click the Lock to AP button. You will return to the WIRELESS tab. Enter any needed security information for this Wi-Fi you are attaching to and then press the Change Button on the lower right. The Apply button that will appear on the blue bar. Click Apply. After several seconds, you will be returned to the MAIN tab where you can monitor progress of the bullet trying to attach to this remote Wi-Fi.
Oh, less you get the idea that the above photo and site-survey seems to be kind of skimpy, not showing too many access points. I should point out I am setting up this repeater literately in the middle of the country - the SW corner of Minnesota! Let me tell you - in the small town we are in (population 200 or less I am sure), that is a good survey. Plus, I was doing it from my 'guys den' down in the basement. If you want to see how this type of system would perform in a more common location, look at this scan I took from Friday Harbor:
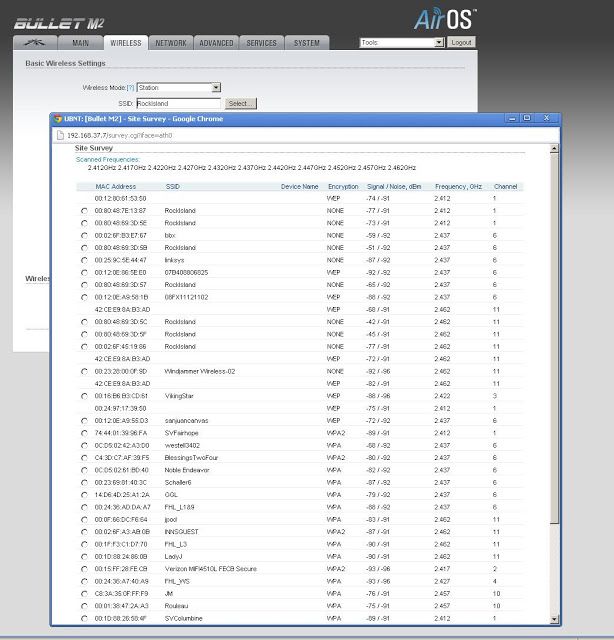
There are over 50 access visible. Just using my computer (without the repeater) I could only see 4 of them... This is all because of the sensitive external antenna gain, and the Bullets good sensitivity.
All Done!
Assuming you were successful in attaching, that is it! You are connected and ready to rock! If the connection failed, do the site survey again and try a different Wi-Fi. (also, make sure you have the correct security code if used).
These days it seems there are less and less open (unsecured) Wi-Fi's out there, but there are a few. We find the repeater invaluable during those few times we come into port and the marina has 'Wi-Fi' - all too often the marina's Wi-Fi setup is not very good, often useless directly by our laptops. But by using the repeater we can lock into an access point with a strong connection. Which brings up a point.
You will notice in the above instruction I suggested clicking the Lock to AP button as opposed to the Select button. We have found that often Marina's will have more than one access point, all with the same SSID. If you click Select, the Bullet will look at all the access points with the same SSID and select the one with the strongest signal. That sounds nice, but we have run into situations where an access point has gone rouge. Being able to lock into a specific access point, even if it is not the strongest, allows us to bypass any failed accessed point in the marina. Also, when we were in Friday Harbor, they had a 'mesh' Wi-Fi in place. Using the Lock to AP capability we could reach across the marina and 'lock onto' the entry point of the Mesh. Kind of cheating, but in this way, we could make sure we were 1st in line when it came to being serviced by the Wi-Fi. This gives us better speed and reliability of Internet access. :-)
3G/4G
Back to my caravan version…
One of the extra features that I wanted from the ‘Viking Star’ design was the ability to use the same antenna and change what was connected to it, so I could then connect to a 3G/4G service.
In Australia, we have vast areas that have no (or very poor) 3G/4G coverage. One of the things that drew me to the antenna I chose was that it had good gain across a wide range of the spectrum. That said, it IS a single antenna so MIMO was not an option, but given its gain I should probably expect a good boost to performance when I am remote to 3G or 4G signals. This means I don’t need to go into towns to get a signal, but rather I can stay in the free camping area slightly out of town and still get connected.
OK, so how did I design the solution?
4G signals are well understood. Various carriers use different technologies and frequencies but information about these systems are widely known and distributed. My selection of antenna was based on those frequencies.
As I am going to be remote I have chosen the major Australian carrier, Telstra. Telstra has the best coverage and speeds on the market. As with other countries, unfortunately this comes at a premium in terms of price, and the support is questionable. That said if you are reasonably technical (or can talk to someone who is) then you can normally sort out the technical issues. That just leaves the high price to contend with. Each to their own.
Just before I bought our caravan Telstra announced a new 4G modem, the Telstra Nighthawk M1 Mobile Router (a re-badged Netgear). This is what I chose, however again I purchased it from Telcoantennas as it was cheaper buying it outright than as part of a bundle with data from Telstra (surprise, surprise…). Do your sums and work it out.
The Telstra Nighthawk M1 Mobile Router has two antenna connections (designed for MIMO). Both connections are TS9 female. So, to connect the modem to the antenna I purchased a connector from eBay with 2 x ts9 male going to a single sma female. See: http://www.ebay.com/itm/SMA-female-to-Y-type-2X-TS9-male-Splitter-Combiner-cable-pigtail-RG174-6-1F2M-/330913770005?hash=item4d0bff6a15:g:GZkAAOxy~g5Rvssb
Connect this to the cable coming into the caravan from the antenna and you are good to go.
I then explored the available plans from Telstra and selected one that met my needs. As I had my own modem already it cut the rate back to something that was acceptable.
There you go
Note: You can only have either Wi-Fi - OR – 3G/4G. You must choose one. You cannot have both on at the same time with this system.
But, a Bit More!
There are a few additional things you can do to improve performance and/or fine tune your setup to your situation. Such as:
- Reducing Channel Conflicts
- Undocumented Bullet remote reset feature.
Reducing Channel Conflicts
Wi-Fi is a standard that has mostly been adopted worldwide. Part of the standard is assignment of frequencies and named 'channels'. Here is a graph that shows how these 'channels' are mapped out in the RF 2.4Ghz spectrum (the most commonly used one):
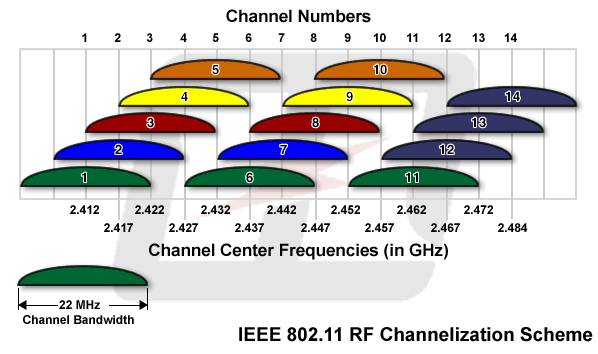
You might quickly notice the channels seem to overlay, and you would be right. As a result, it is common to use channels 1, 6, and 11. You will see this grouping in any site survey you do. Why is this important? Well, with the Bullet we are attempting to isolate a very weak Wi-Fi signal from a distant Access Point. It is kind of like two people on opposite sides of a crowded room trying to talk with each other. With all the background noise going on, they each need to speak louder as well as perhaps cup their ears to try and hear better. We are doing the same things - speaking louder with the high transmission power of the Bullet, and listening better with the high gain antenna. (BTW, of the two - the listening is vastly more important)
While all this is going on lots of other things are making noise - might be other Wi-Fi stations, might be some source other than Wi-Fi (the frequency is part of an 'unlicensed' spectrum - so things like cordless phones, remote control toy cars, etc all use this same set of frequencies) Given the Bullet is trying its hardest to hear above the 'Noise of the Crowd' - if we end up having out local Wi-Fi network (the one we set up using the airGateway) at the same frequency as the far away Wi-Fi access point we are trying to listen to - well, we are just adding to the noise. Look again at the site survey I initial did:
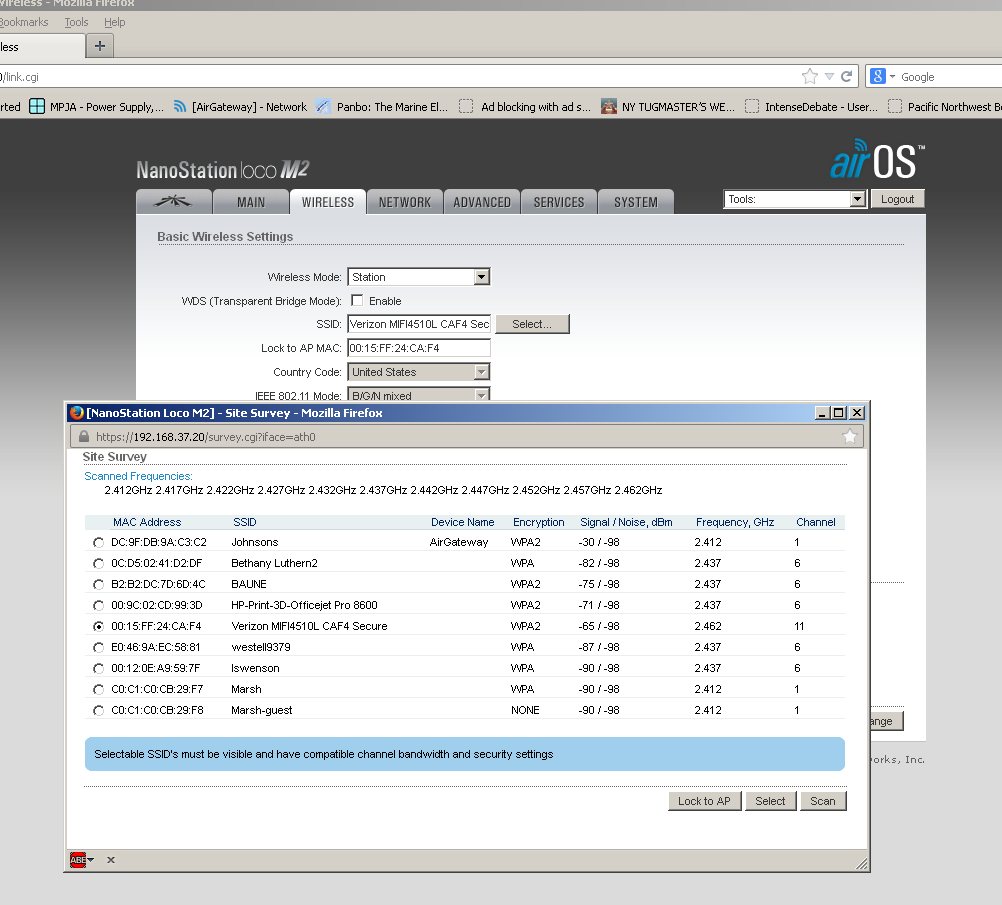
Notice how our new network SSID:Johnsons is on channel 6, as is other Wi-Fi access points I might be trying to connect to. So, in this case I would be best to move Johnsons away from channel 6, the common choices being 1 or 11. Both Channel 1 and 11 are used, but the signal's strength of the Wi-Fi on channel 1 is very low, indicating that is far away. So I will move to Channel 1.
Opening up a browser and type in https://192.168.37.10 (the address were we placed the airGateway). Click past the SSL error screen (you might want to add a browser exception for this as well), enter your new password and get to the main screen. Click on the WIRELESS tab. In order to change channels, we need to change configuration mode from Simple to Advanced. Once that is done, in the Frequency, Mhz box enter enter the frequency of the channel we want to use (referring to the table above). As I want to use Channel 1, I entered 2412 Mhz (same as 2.412 Ghz). Press the Change Button and the Apply button. Once things reset and settle down, go back to the Bullet and do another Site Survey. Now you will see your local access point on a channel that is no longer adding to the confusion.
Each time you lock into a new remote access point you would consider moving your local channel away from the one your locked into. Wi-Fi is designed to share a channel, so if you have a good strong connection to the remote Wi-Fi - no need to go through this step. But if you find your remote Wi-Fi access point is a bit 'in the weeds' so to speak, making sure you local AP is not adding to the noise floor can be helpful.
And btw, this is also why I separate the Bullet and the airGateway by several feet. Even if they are on different channels, having the two devices right next to each other does not help. That 15-20' between them does!
Undocumented Bullet remote reset feature
Lastly, it turns out the Bullets have an undocumented feature to do remote resetting. This person figured it out, and it involves placing a voltage of 14-15v or more into the communication lines of the CAT-5 cable. http://dren.dk/mreset.html
Handy to know in case the Watch Dog timer trick does not work. I also had issues with the built in PoE injectors in the Linksys WRT54G that triggered this.
All rights reserved. OziCyberNomad
© 2023
We need your consent to load the translations
We use a third-party service to translate the website content that may collect data about your activity. Please review the details and accept the service to view the translations.